Case Colt Ingersoll Tractors banner

Case LED Headlight Upgrade Solution!

16K views 31 replies 19 participants last post by  ing3018  
#1 ·
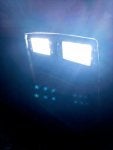
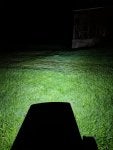
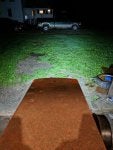
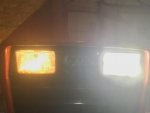
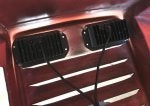
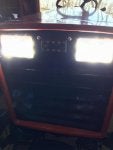
After reading many threads on upgrading the headlights to LED's, I've found a very inexpensive, effective, and easy solution. This modification still looks somewhat stock, it's VERY cheap and easy to do and it blows the stock headlights out of the water, even the glass Speaker lenses with regular incandescent or LED bulbs installed.

For $19 and some change (and free shipping) you can get LED flushmount lights on ebay. They mount right where the factory lights do, they just need the corner of the headlight mounting bracket trimmed off a little bit to fit, they put A LOT of light, they don't get hot and melt and the pair is only a little bit more than the cost of ONE replacement Speaker 780 plastic lens. The height of the lenses is perfect, and the width is almost perfect, but just a little wider than the stock lights, but once mounted, they look just fine. I'll get some pictures of them mounted in my 224 tomorrow, but in the meantime, here's a link for anyone interested. You can't go wrong!

https://www.ebay.com/itm/2X-6inch-1...c&pid=100290&rk=1&rkt=4&mehot=pp&sd=282589777863&_trksid=p2060778.c100290.m3507
 
#7 ·
Well I did this little project. Headlights are definitely bigger than the stock ones. Had to cut about 1" off for width and an 1/8" off for height. Doesn't look too bad though. Light output is a huge improvement from the stock ones. I just need to get a rubber or foam backer so the vibration doesn't destroy the lights or strip out the screws holding them in.

Now who wants to sand blast and paint my hood to make everything look better around the lights!?!?!
 

Attachments

#11 ·
Well I did this little project. Headlights are definitely bigger than the stock ones. Had to cut about 1" off for width and an 1/8" off for height. Doesn't look too bad though. Light output is a huge improvement from the stock ones. I just need to get a rubber or foam backer so the vibration doesn't destroy the lights or strip out the screws holding them in.

Now who wants to sand blast and paint my hood to make everything look better around the lights!?!?!
Do you have a view from drivers seat with new lights on? i see in the second picture its a heck of alot better than stock .
 
#16 ·
Here's the driver seat photo. The corner of that barn is around 75-100'. The truck is about 50' away.

I'm sort of kicking myself in the foot for not thinking off mounting them behind the hood. Oh well, it's done and I'm happy with lights.
 

Attachments

#18 · (Edited)
I'm sort of kicking myself in the foot for not thinking off mounting them behind the hood. Oh well, it's done and I'm happy with lights.
I am willing to bet that if you removed the lights and adjusted the size of the openings in the grill you could remount them from behind using the exact same mounting holes you have already drilled.

...or Maybe instead of changing the size of the openings just put the speaker 777 lenses back in and bolt these new lights in from the back in place of the old buckets.
 
#20 ·
2x4 LED's From Behind Install

I mounted mine from behind but first installed a vinyl "U" edging around the opening. The edging has a glue in it to make sure it stays in place. The edging was left over from spot light kits that I use to install on Crown Vics. Only thing I would do different at this point is paint the light housing the same black as the grill front which I will do.
View attachment 98609
 
#21 ·
W
I mounted mine from behind but first installed a vinyl "U" edging around the opening. The edging has a glue in it to make sure it stays in place. The edging was left over from spot light kits that I use to install on Crown Vics. Only thing I would do different at this point is paint the light housing the same black as the grill front which I will do.
View attachment 98609 View attachment 98611 View attachment 98613 View attachment 98615 View attachment 98619
Was the mounting holes already there or did you have to drill them ?

@Caseybeglin , Thanks for posting the pictures those lights have amazing output, Can actually use them to see at night !
 
#23 ·
80case444 - Yeah, I had to drill new holes. I have yet to mow in the dark with them, but I think it is definitely doable. Will be finding out tonight.

Jessec - I like the edging idea. I was trying to come up with the a solution like that so there was some cushion between the light fixture and the hood, much like the original lights did.
 
#25 ·
Leds don't make much heat from the "bulb", in fact, they don't even melt snow much in wintertime. The driver, "electronics" that run them generate the heat. That is why high powered light bars and the like have big aluminum finned heat sinks to cool them. No worries with the little lights used here.:thumbsup:
 
#26 ·
I agree with you. Figured I would add some confusing reasoning :thumbsup:

The LED's themselves are typically mounted to an aluminum substrate circuit board to conduct heat away from the LEDs. The aluminum substrate circuit board is then heat sunk to the heat sink using a thermal interface material. The driver circuits are also heat sunk to the heat sink again using a thermal interface material.

LEDs themselves are very efficient. The ebay listing gives no datasheet or spec but if we assumed 80% efficiency meaning 20% heat loss, 18W per light results in 3.6W per light LED heat loss. The listing also gives an operating voltage range of 10-30VDC. If we again assumed 18W at 10VDC input, that would be 1.8Amps. If we again assumed the lights use a constant current driver circuit and were operating from 14VDC, the loss from the driver circuit would be (14VDC - 10VDC) * 1.8Amps = 7.2W. If you raised the input voltage to 28VDC the driver circuit loss jumps to 32.4W. This is likely why the lights have such large heat sinks.

The lights also list an operating temperature range of -40C to 85C (-40F to 185F). The ebay listing does not give any temperature or voltage derating on the lights so again assuming you can run the lights at 30VDC at 85C (lots of heat at high temp) the lights should be fine at 14VDC under the tractor hood.

I know, a lot of assuming in my example…
 
#27 ·
After reading previous posts on upgrading the stock headlights I decided I wanted to give it a try. I first have to give the credit to jpswift1 for his idea on finding the LED lights on Ebay! Great Find!!
Whenever I am adding or making any changes I like to have it possible to go back to the original stock part. I don’t like to cut or drill holes that aren’t necessary! The lights he found fit pretty darn close. I had to sand the edge of the lights a bit but not much. I wanted to keep the factory look so I mounted the lights behind the stock lenses. I used the 2 existing mounting holes which align perfectly with the holes on the LED lights. I cut and used felt pads (that you put on the bottom of chair legs to protect your floors) between the light and the lens. The felt keeps a nice cushion between lenses and lights and it snugs up very nicely with the two mounting screws. If I ever decide to go back and use the buckets and stock lights I can because I never drilled any new holes. I have run the tractor several times with the lights on and have had no issues! I would say they are probably 3 times brighter than the stock 1156 bulbs! The one photo shows the difference between the stock lights and the LEDs! Anyone wanting to upgrade you really can’t go wrong! Dan
 

Attachments

#28 ·
Just to CLARIFY; I did have to drill clearance holes for a # 10 screws to mount the lights. The existing holes in the grill aligned perfectly on the flange of the lights. (Do not want to cause any confusion). Also the lights are a much more of a “white” light. It definitely helps improve visibility at night! Dan
 
#31 ·
Great thread. I switched to 1156 base LEDs, several yrs ago and have no regrets.

I did take several pics but none really captured the upgrade to the light they produced.

https://casecoltingersoll.com/showthread.php/37273-Another-LED-test?highlight=LED

I still like the first set, over the second, for the cited reason, more uniform light but even the second set is such an upgrade to stock, as to be no contest.

Since the prices between the fixtures described here and just getting a pack of 1156 LEDs are competitive, the question becomes one of mounting, finished product and if necessary, future replacements.

I love to see and learn from the ingenuity, in finding them and ultimately resulting in an installation with a stock look, with minimal modifications.

I also think its a safe bet, that these put out more and more uniform light than what I have. Possibly, by quite a bit.

Pros n Cons.

Mounting,

The light fixtures can be mounted with a stock look but require some, if minimal modification.

The 1156s are plug n play, though the second set were much better on tractors that can have the bases oriented downwards, than on Vangaurd powered tractors, with the heat shield.

Heat,

I can't speak to lack of heat to melt snow from accumulating on the lights. My guess is, this is a problem only for tractors made before they reversed the engines. Also, I suppose even then, its only a problem when blowing powder, or working during heavy snowfall. I could be underestimating it but since the quality of light is so much better than stock, I wonder how much real worry that is. Though if you already have halogens and glass lenses, then maybe the trade off is the lower electricity demand.

These fixtures, with their heat dissipaters in the rear, may not work well with 4 digit tractors, as they push heat towards them. Just a guess.

Durability and future replacements,

I've been running the 1156 LEDs for 3 yrs. and other than a bad one out of the box that was replaced under warranty, I've had no issues. If I do in the future, again, plug n play and lifetime guarantee.

The new fixtures? A certain amount of risk has to be recognized that future replacements may not be so easy. Also, I wonder ... are these required to work in pairs? If one goes bad, is the other still good? If not, is there a workaround?

Finished product output.

Again, the upgrade to the 1156s was significant and my pics didn't properly capture that but it does look like the fixtures put out even more and more uniform light.

One way to kick the performance of the 1156s, might be to polish, or spray chrome, the interior of the stock fixtures. I haven't done that yet but the next time I take them out the clean them, I just may.

Everyone will have different things they think important. At this time, I'll stick with the 1156s, for ease of use and known dependability, with potential for even more tech and price improvements, as well as a fairly simple potential boost of output via polishing / chroming.

Your mileage may vary.
 
#32 ·
Due to the heat shield placement in my Vanguard powered tractor, the bulbs have to be mounted with the bulb base pointing up. This positions the bulbs within the reflector such that their light output mostly shines up. Makes them very ineffective. I only turn them on to see if they still work. My Onan powered tractor has more effective lights.
For snow blowing, I have lights mounted on the top of the cab. Some previous winters, when I didn't feel like installing the cab, I either used a magnetic mount 12V work light or a headlamp.
Polishing the reflector buckets is effective.